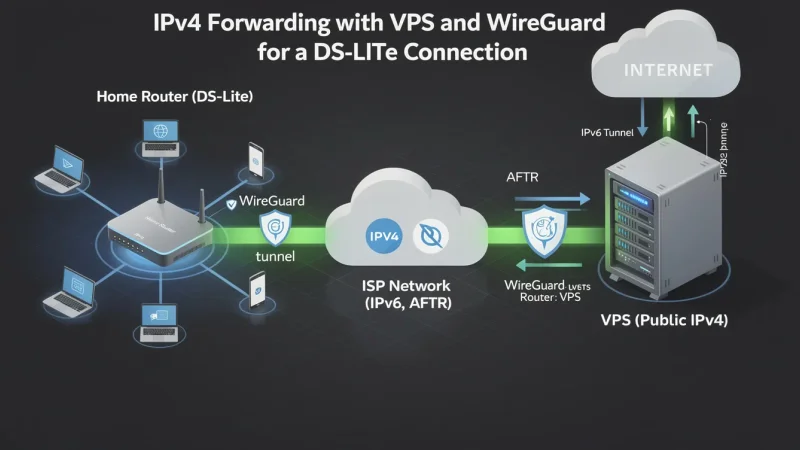
IPv4 Forwarding with VPS for a DS-Lite Connection
This guide sets up a VPS with a public IPv4 address as an “outpost” for a DS-Lite connection (e.g. sim.de, Vodafone, …).
Goal: Services on your home network (web server, NAS, etc.) should be reachable from the outside via the VPS’s fixed IPv4 address, even though the router (in this example a FRITZ!Box) itself only has a changing public IPv6 address.
Architecture: The FRITZ!Box acts as the WireGuard server, the VPS as the WireGuard client. Incoming traffic on the VPS is forwarded through the tunnel into the home network via DNAT.
Prerequisites
- A VPS running Debian/Ubuntu with a fixed public IPv4 address.
- A FRITZ!Box running FRITZ!OS 7.29 or later (WireGuard support), tested with a FRITZ!Box 7590 / FRITZ!OS 8.25.
- Root or sudo access on the VPS.
- Access to the FRITZ!Box interface (fritz.box or 192.168.178.1).
- Important: Access to your VPS provider’s web console (Hetzner Cloud Console, Netcup VNC, etc.) as a fallback in case SSH drops out during setup.
Part 1: Enable MyFRITZ! (Making the FRITZ!Box Addressable)
Since DS-Lite connections only have a changing public IPv6 address, the VPS needs a fixed hostname so it can always find the FRITZ!Box.
- Open the FRITZ!Box interface → Internet → MyFRITZ! Account.
- Enable MyFRITZ! access (if not already done).
- Note down the assigned hostname for your local server, e.g. server.abcdefghijklmnop.myfritz.net.
This hostname stays stable even when the FRITZ!Box’s IPv6 address changes.
Part 2: Create the WireGuard Connection on the FRITZ!Box
- Internet → Permit Access → VPN (WireGuard) → Add VPN Connection
- Choose the WireGuard option, connection for a single device/user (not “site-to-site” – the single-device variant makes the FRITZ!Box generate a ready-made configuration file, including its own key pair).
- Give the connection a name (e.g. “VPS”) and save it.
- Download the generated configuration file (e.g. vps.conf).
Why this order matters: The FRITZ!Box internally uses a single private key for all WireGuard connections. Importing a self-made config with a foreign PrivateKey fails with the error message “The imported configuration file of the WireGuard remote peer causes a key conflict”. If you let the FRITZ!Box generate the config instead, this problem disappears entirely.
Part 3: Transfer the Config to the VPS
scp vps.conf root@<VPS-IP>:/etc/wireguard/wg0.confView the file:
sudo cat /etc/wireguard/wg0.confTypical contents (example values):
[Interface]
PrivateKey = <generated by the FRITZ!Box>
Address = 192.168.178.203/24, fd41:2ff5:823c::203/64
DNS = 192.168.178.1

[Peer]
PublicKey = <public key of the FRITZ!Box>
Endpoint = server.abcdefghijklmnop.myfritz.net:51820
AllowedIPs = 192.168.178.0/24, 0.0.0.0/0, fd41:2ff5:823c::/64, ::/0This file must be modified in two places before the first start (Parts 4 and 5) – otherwise you risk the two most common errors of this setup.
Part 4: Remove the DNS Line (Prevents a Startup Failure)
If a DNS = line is present, wg-quick tries to call the resolvconf tool to register the DNS server system-wide. This is not installed on most slim VPS images and makes the service fail with status=127.
sudo nano /etc/wireguard/wg0.confDelete the line:
DNS = 192.168.178.1The VPS doesn’t need this DNS server – it is only supposed to forward packets into the home network in a targeted way, not redirect its own DNS traffic.
Part 5: Restrict AllowedIPs (Prevents an SSH Lockout!)
By default, the config generated by the FRITZ!Box contains 0.0.0.0/0 and ::/0 in AllowedIPs. This instructs the VPS to route all of its internet traffic – including your running SSH connection – through the tunnel to the FRITZ!Box. As soon as the tunnel comes up, SSH drops and the VPS is only reachable via the provider’s web console.
sudo nano /etc/wireguard/wg0.confReplace:
AllowedIPs = 192.168.178.0/24, 0.0.0.0/0, fd41:2ff5:823c::/64, ::/0with just the home network subnet (no 0.0.0.0/0, no ::/0):
AllowedIPs = 192.168.178.0/24, fd41:2ff5:823c::/64Narrow it down even further (recommended): If you only want to make a single device reachable (e.g. your web server at 192.168.178.163), enter only its address with /32:
AllowedIPs = 192.168.178.163/32This makes only that one device reachable through the tunnel – all other devices on the home network (including the FRITZ!Box itself) remain unreachable from the VPS. Several individual devices can be added, separated by commas:
AllowedIPs = 192.168.178.163/32, 192.168.178.1/32Part 6: Enable IP Forwarding
sudo nano /etc/sysctl.confAdd/uncomment the line:
net.ipv4.ip_forward=1Apply it:
sudo sysctl -pPart 7: Start the WireGuard Tunnel (with SSH Safeguard)
For this, open two separate terminal windows/sessions to the VPS – if the connection drops because of a configuration error, you still have access in the second window to correct it.
sudo systemctl start wg-quick@wg0
sudo systemctl enable wg-quick@wg0
Check the status and handshake:
sudo wg showA successful connection shows a line latest handshake: X seconds ago. If this line is permanently missing, check the keys, endpoint, or firewall/cloud firewall rules (see Troubleshooting at the end).
Test the connection to the home network:
ping 192.168.178.163Note: Some FRITZ!Box devices block ICMP/ping on VPN interfaces – if ping doesn’t respond but the handshake is established, test directly with a TCP service, e.g. nc -zv 192.168.178.163 80.
Part 8: Open the Firewall on the VPS
Allow the WireGuard port and firewall forwarding:
sudo iptables -A FORWARD -i wg0 -j ACCEPT
sudo iptables -A FORWARD -o wg0 -j ACCEPT
Part 9: Forward HTTP/HTTPS into the Home Network via DNAT
Redirect incoming traffic on ports 80/443 to the destination IP in the tunnel (example destination 192.168.178.163):
sudo iptables -t nat -A PREROUTING -p tcp --dport 80 -j DNAT --to-destination 192.168.178.163:80
sudo iptables -t nat -A PREROUTING -p tcp --dport 443 -j DNAT --to-destination 192.168.178.163:443

sudo iptables -A FORWARD -p tcp -d 192.168.178.163 --dport 80 -j ACCEPT
sudo iptables -A FORWARD -p tcp -d 192.168.178.163 --dport 443 -j ACCEPT
Make sure MASQUERADE is in place for the return path:
sudo iptables -t nat -A POSTROUTING -o wg0 -j MASQUERADEVerify:
sudo iptables -t nat -L POSTROUTING -v -nSave the rules permanently (otherwise they are lost on the next reboot):
sudo apt install iptables-persistent -y
sudo netfilter-persistent save
Part 10: Port Forwarding on the FRITZ!Box Itself
In addition to the DNAT rule on the VPS, the FRITZ!Box must locally forward ports 80/443 to the target device (independent of the WireGuard tunnel, a normal port forward):
Internet → Permit Access → Port Sharing → select device 192.168.178.163 → allow port 80 (HTTP) and 443 (HTTPS).
Part 11: End-to-End Test
From an external device (not the VPS, not on the home network – e.g. a smartphone on the mobile network):
curl -I http://<VPS-public-IPv4>
curl -Ik https://<VPS-public-IPv4>
If a response comes back from your home network server, the entire chain works.
To monitor live during the test whether packets are arriving at all:
sudo iptables -t nat -L PREROUTING -v -n
sudo iptables -L FORWARD -v -n
The packet counters (pkts) on the matching rules should be counting up.
Part 12: DNS Records for Your Own Domain
Goal: A hostname like server.yourdomain.com should be reachable via IPv4 through the VPS tunnel and via IPv6 directly through the FRITZ!Box. An A record and an AAAA record can exist side by side for the same name (no conflict) – a CNAME pointing to myfritz.net, on the other hand, does not work here, because a CNAME cannot coexist with an A record on the same name.
| Record type | Value | Update method |
|---|---|---|
| A | Public IPv4 of the VPS | Static, enter once |
| AAAA | Current IPv6 of the FRITZ!Box | Dynamic, since DS-Lite changes the address |
A record (once, at your domain’s DNS provider):
server.yourdomain.com. A <VPS-public-IPv4>AAAA record (dynamic via DynDNS):
Since the IPv6 address changes regularly with DS-Lite, you need a DynDNS service that supports AAAA updates for your own domain (not just myfritz.net subdomains), e.g. deSEC (free, selectable directly as a provider in FRITZ!OS) or IPv64.net.
Setup in the FRITZ!Box: Internet → Permit Access → DynDNS → select provider → enter credentials and domain. The FRITZ!Box will then update the AAAA record automatically on every prefix change.
Troubleshooting – The Most Common Problems of This Setup
| Symptom | Cause | Solution |
|---|---|---|
| wg-quick fails with resolvconf: command not found (exit 127) | DNS = line in the config, resolvconf missing on the VPS | Remove the DNS line from wg0.conf (Part 4) |
| Key is not the correct length or format | Placeholder text left in the config instead of the real public key | Enter the real key, check the exact Base64 string |
| FRITZ!Box import: “Key conflict with existing connections” | The FRITZ!Box uses a single PrivateKey for all WireGuard connections; a self-made config with a foreign PrivateKey is rejected | Don’t import your own config with your own PrivateKey – let the FRITZ!Box generate the config instead (Part 2) |
| SSH connection to the VPS drops as soon as the tunnel starts | AllowedIPs contains 0.0.0.0/0 / ::/0, all VPS traffic is redirected | Use the provider’s web console, stop the tunnel, restrict AllowedIPs to the home network subnet or target IPs (Part 5) |
| wg show shows no latest handshake | Wrong endpoint/port, cloud firewall blocks UDP 51820, or wrong keys | Check the cloud firewall rules at the VPS provider, double-check the endpoint (MyFRITZ! hostname:51820) and keys |
| Ping through the tunnel doesn’t work although the handshake is established | The FRITZ”Box blocks ICMP on the VPN interface (normal behavior) | Test a TCP service directly instead of pinging, e.g. nc -zv |
Quick Overview: How the Components Work Together
flowchart LR
    A[Internet client] -->|HTTP/HTTPS port 80/443| B[VPS<br/>public IPv4]
    B -->|DNAT + iptables| C[WireGuard tunnel<br/>wg0]
    C -->|encrypted via IPv6| D[FRITZ!Box<br/>WireGuard server]
    D -->|Port forwarding| E[Target device on home network<br/>192.168.178.163]